Research Techniques and Methods/Applying Research Techniques and Methods
(Starts at Slide 9)
Presentation Video Link
https://www.youtube.com/watch?v=iAYXpQk6Pyw
Monday, 12 December 2016
Tuesday, 5 July 2016
Unit 17: Soundtrack production for the moving image
Sound effects for the moving image
Whilst some audio for film (i.e. conversations) are captured during filming, there are some cases where this is impossible. For example, in a sci-fi film, a laser weapon does not yet exist, so no sound can be recorded as the shot has yet to be added via CGI. In cases like this, the sound effects are created in post production (after the film finishes shooting).
Background information on moving image production
- Film - Films are mostly created to be released to the general public, either online or in theaters. They are created by filming a series of takes, then selecting the best and editing them (along with dialogue, background noise and any music) in post production.
- Television - creating television programmes follow mostly the same process as films, except that series are produced under a much smaller timeframe than films and are obviously intended for release on television instead.
- Web - Most web content is recorded without the use of expensive audio equipment (i.e. boom microphones). As such, this forgoes having to line up dialogue, but does mean that the recorded audio will be of a lower quality. Since most content is self produced, this means that content producers are able to work at their own pace, meaning the timeframe in which content is made can range from days and weeks to even months.
- Hand-held devices - These work by capturing audio and still images then combining them together into a video file (i.e. MOV or MP4) that can be edited using video editing software.
- Animation - there are many types of animation such as cell (hand drawn), stop motion (taking a large amount of pictures) and CGI (computer generated); however the animation is performed, the film/frames will be edited with music and voiceover via computer software. In order to have the audio line up with the visuals correctly, the voiceover needs to be recorded first, to allow the moving image to be tailored to the audio that has been already recorded.
Audio Components
- Studio and location - A studio is a location desired for optimal sound recording as it lacks background noise due to soundproofing. This works perfectly for productions like news, as it allows for the sound to be heard more clearly, but won't be useful for productions where background ambience is required. In comparison, 'on location' refers to an outside area (usually) that would not be typically used for sound recording. This is useful for capturing ambience, but may mean that post production editing is required in order to get dialogue to come across more cleanly.
- Interviews - these will usually be mic'ed up with small microphones attached to both the interviewer and the interviewee(s). The recorded audio will then be synced up with the video footage later in post-production.
- Presentation - This works pretty similarly to other situations. The presenter will either have a wireless handheld mic or a small clip on mic (as with the interview) that transmits to the sound system (PA), and will have a remote control as to control their presentation slides with in the background. If the presentation has sound also, these levels will have to be balanced with the mic audio, as to not drown it out, or to damage the equipment.
- Voiceover - if a programme or film uses a voiceover - it will be recorded separately in a studio after filming has completed, then laid over the film. The actor recording the dialogue may have the footage visible, as to time their performance correctly.
- Drama dialogue - for a drama production, multiple voices will need to be captured. As such, production crews will use large, handheld mics on poles known as Boom mics. These are held above the shot, at a good balance between capturing all dialogue clearly, as well as remaining out of shot.
- Ambient sound and Sound effects (SFX) - these small, background details act as 'icing on the cake' in terms of a soundtrack, helping to enhance the mood and feel of a film. These are recorded in a process known as Foley (described below).
- Stationary and moving sound sources - These do exactly what they 'say on the tin'; a stationary sound source refers to something being recorded that is not moving, whilst a moving sound source is. As a moving sound source moves closer then further away from you, its pitch and volume will increase then decrease respectively; this is known as the Doppler effect.
- Use of presence - this refers to how sounds are mixed in a soundtrack. A good way to do this is to vary sound levels depending on the perceived distance form the camera; closer objects will be louder whilst distant objects will be quieter. In addition, one may wish to pan sounds based on their location in the set (either to the left or right).
- Diegetic - Sound where the source is visible on screen, i.e. from characters or from props (sounds characters can hear)
- Non-diegetic - Sound from outside the environment of the film (i.e. the music soundtrack)
- External diegetic - Sound put in outside the shot but can be heard by characters (i.e background noise/foley)
- Mood - Soundtracks will often be used to portray a certain 'mood' that aligns with the footage being shown. For example, a scene in a nightclub would feature music typically played on the dance floor, i.e. rap and drum/bass.
- Meaning - This involves adding deep emotional quality to a scene via the music chosen. For example, a death scene may feature a string quartet playing in a minor key, as to enhance the sadness felt by the characters.
- Illusion - This involves adding certain background noises from objects that are not necessarily on screen to create an atmosphere. For example, an outer shot of a school building may include the sound of the school bell; whilst it won't be in shot, it adds to the feeling that the viewer is at the school.
Foley artist
A Foley artist's job is to create/recreate sound effects for film. For example, sounds may be needed for weapons (swords/guns etc.), or the film director may not be happy with the audio of a recorded scene, so some sounds (i.e. footsteps) will be recreated and overdubbed onto the footage. Foley artists work in a specialised studio, with recording equipment, a viewing screen and props. The artist is able to watch the film then recreate any needed sounds in real time whilst watching it.
Own FX
With this clip, I began by making 'wind' noises by moving a Shure SM57 across a variety of different surfaces, namely a carpet, a table top and a chair, combining these tracks together and adding a small amount of reverb. The cat sounds were created by myself and then pitch shifted in Cubase to a higher octave. Finally, I added the footprints by moving my feet in a box of rocks, adding a small amount of reverb as well. As a first attempt, I was satisfied with this effort, but I do feel that I could have added extra cat noises (i.e. in the second half of the video) as to better sync up with the footage.
Marker Track
When editing sound to film, it may be useful to add markers; these are set time codes that define important points in a video clip, such as scene changes or shot changes.
Once a film clip is dragged and dropped into a Cubase project, it is possible to add these markers below the film on the timeline. After a marker track is added (Add Track -> Marker), the pencil tool is used to 'draw' in markers at certain points throughout a clip.
Time Warp
Once markers have been added, the BPM must be warped so that gaps between markers either last for 2, 4 or 8 bars. In Cubase, this is performed by selecting the 'Time Warp' tool, then dragging the timeline so that each marker is set accurately. In turn, this also makes any music laid over the film sound more natural, as in real life not all performed music will always be exactly in time.
Sylenth
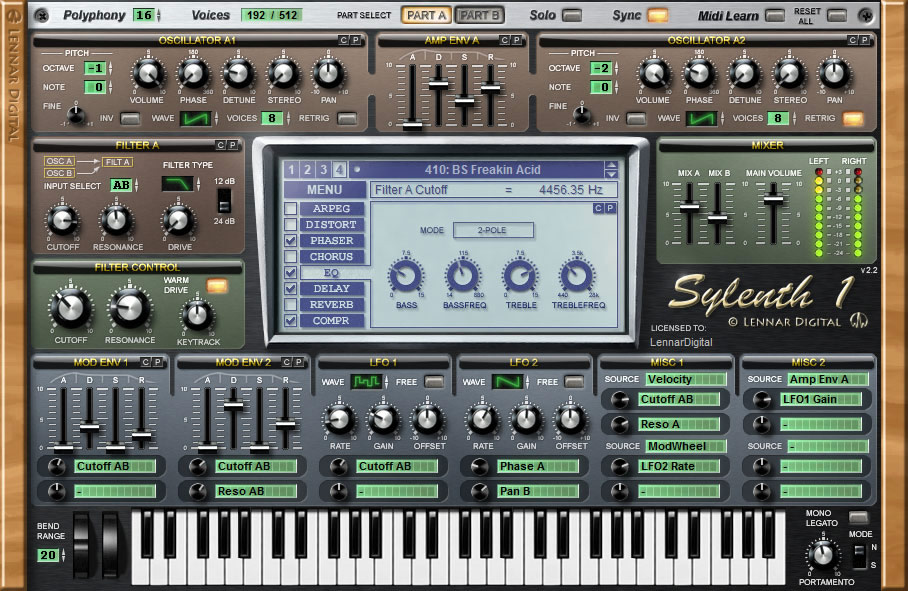
Synthesizers (such as Sylenth) include many modules and parameters that can affect the overall sound produced:
- Oscillators - these generate the actual sound waves (note) that form the output of the synth. The basic note can be generated using various forms of waves, including sine, triangle and pulse.
- Envelope - this alters the sound being generated in real time in response to the actual sound being played. Envelopes have four main parameters; attack (how long the note takes to reach full volume), decay (time before the note ends), sustain (how long the note lasts for), and release (how quickly the note falls silent).
- Filters - these remove certain frequencies from the sound wave. They have two main parameters; cutoff (point at which frequencies higher than the cutoff should be attenuated) and resonance (amplifies frequencies nearest to the cutoff). Different types of filter include low pass (cuts off higher frequencies), high pass (cuts off lower frequencies), notch (targets specific frequencies) and band (removes a large amount of frequencies from the sound wave).
- LFO (low frequency oscillator) - an electronic signal used to control a variety of effects and parameters, i.e. filter cutoff. Though mostly used in synths, LFOs can be used to control effects for instruments such as guitar: in this example (https:/ /youtu.be/T-i_xRzochI?t=131), an LFO is being used to trigger a low pass filter at such a rate that a 'wah' type effect is being generated.
City by the Sea
https://www.youtube.com/watch?v=Fo_GDMM9wPE
The above link refers to the first assignment set, in which I created a short 2 minute soundtrack for a timelapse video of the city of Benidorm.
The above link refers to the first assignment set, in which I created a short 2 minute soundtrack for a timelapse video of the city of Benidorm.
Film Project
In collaboration with the TV and Film BTEC group, we have have produced a short film; a crime drama entitled "Bangers and Mash".To begin with, we spent a few days working on opening and ending themes for the film.
https://soundcloud.com/user-239608709/sets/credit-music
Tuesday, 14 June 2016
Unit 49: Setting up audio equipment
Equipment list
Listed below are the steps required to set up the sixth form audio equipment:
- Mixer (Yamaha EMX 5016CF)
- Power amp
- Main and sub speakers (dB speakers)
- Support poles
- XLR cables
- Speakon cables
- Jack cables
- Microphone (Shure SM58)
- Power leads
- Masking tape
Listed below are the steps required to set up the sixth form audio equipment:
- Take boxes apart
- Keep lids away for safety
- Keep mixing desk on power supply and move desk to position
- Lock wheels for safety
- Move base bins to position (left and right)
- Add pillars
- Set up main speakers on top, about same height
- Ensure everything is secure tight
- Connect speakon cables to power supply
- Make sure everything is taped and out of way
- Connect desk to the amps with jack leads (balanced)
- Plug to mains
- Flat line desk otherwise bad noises
- Add xlr cable for mic
- Turn on desk first, check desk
- Turn on speakers
- Level testing
Risk assessment
There are several risks that must be dealt with whilst the equipment is being set up:
Electrical risks
- Exposed to live wire - coming into contact with any live electrical sources could lead to electrocution.
- Plug socket - tampering with any plug sockets could lead to electrocution.
- Broken cable - coming into any possible contact with split cables could lead to electrocution.
- Water - water near to any electrical equipment could lead to electrocution and/or damage to the equipment.

- Lift with your knees - it is important to lift any heavy equipment in a suitable manner in order to avoid injury.
- Tripping over wires - any exposed wires in a performance space could pose a potential trip hazard.
- Things Falling over - all equipment should not be at risk from falling over, as this could cause injury.
- Safe handling/storage - all equipment should be stored out of the way when not in use.
- Keep lids out of way - storage box lids should not block any part of the performance space.
- Tape up wires - this will prevent them becoming a trip hazard.
- Leave it as found

Noise levels
- Don’t go over 107dB - the maximum noise level from a gig (within the audience) should not exceed this limit, as otherwise the law will have been broken.
- Feedback - this can be prevented by always keeping the mic behind speakers, and never in front, as this will cause a feedback loop as the microphone will pick up what it is outputting.

Tuesday, 3 May 2016
Unit 49: Composing using music technology
Compositional Skills
FormForm is how each section of a composition is set out in terms of chord progressions. Typically in a pop song, chord progressions will follow an A-A1-B-A1 form, with each section being 4 bars long to form a 16 bar progression.
Structure
Structure defines how a composition is made up (in terms of sections). Typically, a pop song will follow this structure:
- Intro
- Verse
- Chorus (repetitive, with a catchy hook)
- Middle Eight (also known as a bridge, usually 8 bars long)
- Instrumental (could also be a solo section)
- Outro/Coda
Each part of the structure will use a different form; for example, the verse will have a different chord progression to that of the chorus.
Inversions and Extensions
Not all chords used in a composition have to be in root position; it is possible to flip the order of the notes. This is known as an inversion. For example, you may want to invert a C Major chord (C-E-G) to either first inversion (E-G-C) or second inversion (G-C-E).
Extensions can also be used. This is when extra notes are added into a chord. For example, a C Major chord could be turned into a C Major 7 chord just by adding a B note in as well (C-E-G-B).
Genre
Genre dictates the style of music that a composition is. For example, this may be rock, pop, country etc.
Repetition and Difference
Repetition is when certain elements of a composition are repeated throughout it. This may be:


Genre
Genre dictates the style of music that a composition is. For example, this may be rock, pop, country etc.
Repetition and Difference
Repetition is when certain elements of a composition are repeated throughout it. This may be:
- Melody line (this is known as an ostinato or riff)
- Chord progression
- Entire sections
However, it is also good to be different throughout as well (i.e. changing lyrics for new verses) as too much repetition will cause listeners to become bored.
Composer's Rights
Usually, composers will have master copies of their records owned by their record label. However, they are able to distribute their music through what is known as a publishing company. The composers agrees to hand control of their copyright over to the publishing company, who in return are able to:
- License usage of the composition(s) for other uses
- Collect royalties
- Monitor where compositions are used
As well as publishers, other organisations exists to obtain royalties for other reasons. For example, the Performing Rights Society (PRS) work on behalf of musicians and record labels to gain royalties for when the composition is performed live (i.e. in concert).
If someone wishes to sell a cover of a song, they must first get permission from the record label and publishing company to do, in the process agreeing to give royalties to both parties. In addition, a license must be obtained to be able to sell the cover. If the song is only being sold as a physical copy, a mechanical license will be needed. However, if the song is also being sold online/available for streaming, then a synthetic license will also be required.
If someone wishes to sample a section of a song, they must obtain clearance to do so, as well as lawfully obtain rights to the copyright for that song. In the past, there have been notable cases where artists have failed to do so, leading to court cases and lawsuits. Before the 1980's, sampling was done withoutA lot of the time, these are resolved by adding the suing party onto the writing credits for the affected track. For example, Tom Petty was added onto the writing credits for Sam Smith's "Stay with Me" as the song held a lot of similarities with Petty's song "I Won't Back Down".
Sound Design
Many compositions are created with the help of samples; these are short clips that can potentially be of anything, ranging from instruments to random noises.
There are several ways which samples can be obtained and edited:
- Sound effects - these can range from reversing (playing backwards) to pitch shifting (changing how high or low the note is)
- Sampling from actual songs - many popular bands will often take samples from other people's work, then edit them with effects to make them unrecognisable. Other times, the samples may literally be like-for-like with the original song, maybe with a simple key change or EQ effect applied.
- Waveform manipulation - this involves manipulating the actual sound wave directly. Cubase allows for warp (time alignment) as well as pitch editing (changing the note being played)


Availability
Software inputs
Here is a list of software inputs I used for my composition:
- Lead synth (Sylenth) - this track plays a small melody during the 'verse' of my composition as well as during the outro
- Intro Chords (HaLion Sonic) - I used a different software synth to contrast with the lead line, and this track acts as a chord backing to it
- Chorus Chords (Sylenth) - I used Sylenth to contrast sound with the other chord track. This track plays the chords during the choruses and outro
- Bassline (HaLion Sonic) - unlike the bass guitar track, this bass line is synth based, and provides a backing to the synth chords
Analogue/digital inputs
- Guitar Lead/Rhythm - both of these tracks were recorded via mic'ing up a Fender guitar amp using a Shure SM57. These tracks were added to give more of a rock/new wave feel to the song, in combination with the synths
- Bass - this track was recorded using a DI, and provides a backing to the guitar tracks
- 4 clean guitar tracks (two chord tracks and two guitar harmonic tracks) - all of these tracks were recorded using a DI also, to contrast with the mic'ed up distorted guitar tracks. Two of the tracks provide a chord backing to the bridge and outro, whilst the other two tracks play natural harmonics, which adds atmosphere to the ending of my composition
Editing sources
- Bass drop - this track was created through heavy use of effects. Firstly, a short blank audio file was recorded, then ran through a sine wave generator to generate a note. Then, the 'pitch shift effect' was used in Cubase in order to drop the pitch, whilst fading was also used to gradually bring the volume down
- Freesound tracks - all of these tracks were mostly effected by my use of the trimming tools, in order to reduce their length to fit in certain gaps in my composition. However, some tracks (like the 'rain' track) were edited at the waveform, as I warped the length of the track so it would keep in time with the intro
Sound libraries
When composing my track, I made use of two sound libraries:
- Media Bay - this is the standard sound library that is included with Cubase. I used this library in order to create my drum tracks.
- FreeSound - this is a free online sound library that offers royalty free clips and sound effects. I made use of this website to add some different effects (such as the rain and "ding' sounds in the introduction.
Playback equipment
The headphones I used are the MV44s. These are a high quality headphone set, providing a very balanced sound for mixing.
File transfer
File transferring is carried out by dragging and dropping them into Cubase to import them. When finished, the final mix is exported via the Audio Mixdown feature.
Formats and Compatibility
When creating my composition, I used three main types of file:
- Cubase file - this was the project file that contained my composition, as well as other data such as effects applied and their setting etc. However, it obviously can only be opened in Cubase.
- MIDI file - these were used in my composition to store the synth tracks. MIDI tracks do not take up much room, and they allow for many parameters to be adjusted (i.e. pitch, length and velocity). However, they are mostly only useful when creating electronic instrument tracks, as they cannot accurately simulate some instruments (i.e. a guitar) without sounding 'computerised'.
- Audio file - these were used heavily throughout my composition (guitar/bass tracks, samples) and is also how my final mix down was stored. Whilst individual stems (instrument tracks) cannot be affected after mix down, audio files still have a good high range of ways to manipulate them (i.e. waveform editing and effects).
Copyright Issues
If samples have been used from commercial records, a letter must be written to the original artist's music publishing company as well as their record company asking for permission to sample their work and sell their recording with the sample in. You would need to take into account the methods that they would use to sell the music; if CD's were being produced, the band would need a 'mechanical' license in order to cover any physical copies being sold. On the other hand, if the music is being sold and streamed online (via services such as iTunes, Spotify and YouTube), a 'synth' license would be needed to cover all digital sales. Obviously, if both avenues were being used, both types of license would be needed.
Mixing and Mastering to CD
When mastering to CD, the mastering engineer should be using PQ codes. These contain information such as copyright data, track start and end data and copy protection.
There are several different file formats that can be used to store the audio data, with each having their own advantages and disadvantages:
- MP3 - this is considered to be the most widely used file format for audio. They are supported by practically every device that plays audio and have small file sizes. However, MP3 is a lossy format, meaning they won't be good for applications that require ultra-high quality sound, but they will still be practical for most applications.
- WAV - this is considered to be the best file format for mastering, as it closest to the actual waveform itself (i.e. without any compression). WAV file are notably large however, with each minute of audio taking up roughly 11MB of space.
- AAC - this is (for all intents and purposes) a higher quality version of the MP3 codec that takes up a similar amount of room, which has made it the better choice for many music listeners. Apple sells all music on iTunes in this format. However, a major disadvantage is that AAC is not as widely supported as other formats, due to heavy patenting.
Internet Distribution
There are several ways music can be distributed on the Internet. This includes:
CompressionThere are several ways music can be distributed on the Internet. This includes:
- Streaming - users subscribe to the service (i.e. Spotify) and have instant access to a large collection of songs. Users can either pay for this service (i.e. for no adverts) or use a free service. The artist is then provided with the correct royalties, but in the past streaming services have been criticised for not doing this correctly, leaving some artists out of pocket.
- Video sites - artists often upload their music to video websites such as YouTube, whether they upload a music video or individual tracks. Some users have reuploaded other artist's music in the past in an attempt to make money off the works of others, but Content ID algorithms are now used in an attempt to stop this.
- Torrenting - this is an illegal process, but some often choose to 'share' music with other users for free.
This involves balancing levels of a recording (making louder and quieter noises the same volume and evening out frequencies). This can be adjusted to taste by several parameters, which include threshold (the volume level at which the compression is applied), ratio (how much compression is applied) and make-up gain (compensates for loss of volume whilst keeping the compression effect)

Loudness
When mixing/mastering, it is important not to have the master volume go over 0db, as this may lead to clipping (digital distortion).
EQ
This is adjusting the balance of different frequencies in an audio recording. This can be adjusted in the DAW via a graphic, where the user manipulates the waveform to select which frequencies they wish to boost or tame


Sonic Problems
As previously mentioned, it is important not to create clipping by having volume reach over 0db. This can be prevented by using a limiter, which stops any track reaching over a certain volume threshold. Other problems that may be evident in a poor mix may be too much compression, or EQ that is either creating a mix that is too gassy or too harsh sounding.
Tuesday, 12 April 2016
Unit 48: Mixing and Mastering
Definition of effects/DAW options


- EQ - adjusting the balance of different frequencies in an audio recording. This can be adjusted in the DAW via a graphic, where the user manipulates the waveform to select which frequencies they wish to boost or tame
- Compression - balancing levels of a recording (making louder and quieter noises the same volume and evening out frequencies). This can be adjusted to taste by several parameters, which include threshold (the volume level at which the compression is applied), ratio (how much compression is applied) and make-up gain (compensates for loss of volume whilst keeping the compression effect)
- Balancing - ensuring all parts of a recording can be heard equally in a mix
- Panning - 'moving' different parts to different sides of the stereo field (left or right), adjusted in Cubase by using the slider for each track
- Limiting - preventing an audio signal from going above a set volume threshold to prevent clipping (distortion of the signal)
- Reverb - causing a sound to persist then fade away after it has been produced. The main parameters involved with reverb are the amount (how much reverb to be applied) and dry/wet (the blend between the original sound and the effected sound)

- Grouping - also known as busing, this literally means grouping similar parts together so that effects can be applied all at once. In Cubase, this is done by 'sending' the outputs of the tracks to one group track, as shown:
- Automation - allowing certain parameters, such as volume, to move automatically
Mix 1 - "Let's Stick Together"
For the first mix, I was given the files (stems) and told to mix from scratch. After importing them into my DAW, I organised them according to instruments (vocals, guitars, keys, brass, bass, drums), colour coded them, then grouped some tracks together (in this case, I grouped vocals together).

I then proceeded to mix the song, beginning with the drums, then adding in the bass, keys, brass, guitars and finally the vocals until all parts were mixed and balanced well with each other.
To master the track, I began by opening the mixer up by going to Devices -> Mixer, then opened the effects for the stereo out track. This allowed me to add EQ, multiband compression and other effects to the final mixdown, in order to sweeten the sound. EQ is applied to the master track the same way it would be as a regular track (my settings are shown below, chosen in order to boost bass and higher frequencies), but multiband works differently to normal compression (a screenshot is listed below of the settings, where I also applied compression to bass and higher frequencies); multiband allows you to individually adjust the the different settings for each frequency band, which lets you compress bass frequencies whilst letting through a lot of higher frequencies, for example.


Another method of mastering is known as formatting. This involves exporting the stereo out first as a final mixdown (using 16bit sample depth and 44,100Hz sample rate, also known as CD quality) then reimporting the track back into Cubase and adjusting the settings like a normal track.

Finally, I then mastered the stereo out track and then exported my final mix as a stereo mixdown. It was very important to keep the final output below 0db, as otherwise this would cause the mixdown to clip.
Below is the tracklist along with the list of effects used:
Yellow Mix
For this unit, I also had to mix another project that I had already done for the BTEC; in this case, I chose my cover of 'Yellow' by Coldplay to mix and master. I chose to use the same lot of effects for this mix (EQ, compression, reverb, limiting etc.) but tweaked them to suit the different range of instruments used.
To begin with, I used the same process for the first track, which was to colour code my tracks, group them (this time, I grouped vocals, guitars as well as drums) and them to remove a lot of the background noise (mostly evident in the vocals in between different sections of the song. I then mixed the track, ensuring everything was balanced together and didn't clip by passing over 0db.
When it came to mastering, I used the same method as "Stick Together", which was to master in real time by importing my effects directly into the stereo track. I found this a simpler method to use than formatting, as this method is basically the same without the extra step of exporting the track first.
Here is the link to both of my mixes:
https://soundcloud.com/user-239608709/sets/mixing-and-mastering

I then proceeded to mix the song, beginning with the drums, then adding in the bass, keys, brass, guitars and finally the vocals until all parts were mixed and balanced well with each other.
To master the track, I began by opening the mixer up by going to Devices -> Mixer, then opened the effects for the stereo out track. This allowed me to add EQ, multiband compression and other effects to the final mixdown, in order to sweeten the sound. EQ is applied to the master track the same way it would be as a regular track (my settings are shown below, chosen in order to boost bass and higher frequencies), but multiband works differently to normal compression (a screenshot is listed below of the settings, where I also applied compression to bass and higher frequencies); multiband allows you to individually adjust the the different settings for each frequency band, which lets you compress bass frequencies whilst letting through a lot of higher frequencies, for example.


Another method of mastering is known as formatting. This involves exporting the stereo out first as a final mixdown (using 16bit sample depth and 44,100Hz sample rate, also known as CD quality) then reimporting the track back into Cubase and adjusting the settings like a normal track.

Finally, I then mastered the stereo out track and then exported my final mix as a stereo mixdown. It was very important to keep the final output below 0db, as otherwise this would cause the mixdown to clip.
Below is the tracklist along with the list of effects used:
Track
Number
|
Purpose
of Track
|
Effects
Used
|
1
|
Vocal Grouping
|
·
EQ (boost at 1k, low pass filter at 10-20k)
·
Reverb
·
Compressor
·
Limiter
|
2
|
Lead Vocal
|
·
EQ (boost at 1-5k)
·
Limiter
|
3
|
Backing Vocal
|
·
Panned 50% left
·
EQ (boost at 500Hz - 1k)
|
4
|
Backing Vocal 2
|
·
Panned 50% right
·
EQ (boost at 500Hz - 1k)
|
5
|
Guitar
|
·
Panned 25% left
·
VST Amp Simulator on Distortion setting
|
6
|
Guitar Solo
|
·
VST Amp Simulator on Distortion setting
·
Noise gate (to remove any excess hiss)
·
EQ (boost at 1k)
|
7
|
Keys
|
·
Panned 60% left
·
Reverb
·
Delay (ping pong setting to create ‘bounce’)
·
Chorus (adds modulation effect)
·
EQ (boost at 2.5k)
|
8
|
Trumpet
|
·
Panned 40% left
·
Reverb
·
Limiter
|
9
|
Trombone
|
·
Panned 40% right
·
Reverb
·
Limiter
|
10
|
Bass
|
·
Panned 50% right
·
VST Amp Simulator
·
EQ (boost at 200-300Hz)
|
11
|
Cymbals
|
·
EQ (boost at 5k)
|
12
|
Hi Hat
|
·
EQ (boost at 500Hz, reduction at 1k)
|
13
|
Snare
|
·
Panned 20% right
·
EQ (Boost at 200Hz and 500Hz)
|
14
|
Kick
|
·
Panned 20% right
·
EQ (Boost at 200Hz and 500Hz)
|
Stereo OUT
|
Final Mixdown
|
·
EQ (boost at 200Hz and 500Hz, 1k and 5k)
·
Multiband Compressor (boost at 200Hz and
500Hz, 1k and 5k)
|
Yellow Mix
For this unit, I also had to mix another project that I had already done for the BTEC; in this case, I chose my cover of 'Yellow' by Coldplay to mix and master. I chose to use the same lot of effects for this mix (EQ, compression, reverb, limiting etc.) but tweaked them to suit the different range of instruments used.
To begin with, I used the same process for the first track, which was to colour code my tracks, group them (this time, I grouped vocals, guitars as well as drums) and them to remove a lot of the background noise (mostly evident in the vocals in between different sections of the song. I then mixed the track, ensuring everything was balanced together and didn't clip by passing over 0db.
When it came to mastering, I used the same method as "Stick Together", which was to master in real time by importing my effects directly into the stereo track. I found this a simpler method to use than formatting, as this method is basically the same without the extra step of exporting the track first.
Track Number
|
Purpose of Track
|
Effects Used
|
1
|
Vocal Group
|
·
De-esser (removes sibilance)
·
Compressor
·
Reverb
|
2
|
Vocal 1
|
·
EQ (reduction at 200Hz and 10k)
|
3
|
Vocal 2
|
·
EQ (reduction at 200Hz and 10k)
|
4
|
Backing Vocal 1
|
·
EQ (reduction at 200Hz and 10k)
|
5
|
Backing Vocal 2
|
·
EQ (reduction at 200Hz and 10k)
|
6
|
Guitar Group
|
·
Compressor
·
Reverb
|
7
|
Distortion 1
|
·
EQ (boost at 250Hz and at 7.5k)
|
8
|
Distortion 2
|
·
EQ (boost at 250Hz and at 7.5k)
|
9
|
Clean 1
|
·
EQ (low and high pass filters, as well at
reduction at 1k)
·
Panned 44% right
|
10
|
Clean 2
|
·
EQ (low and high pass filters, as well at
reduction at 1k)
·
Panned 33% left
|
11
|
Acoustic 1
|
·
EQ (high pass filter, reduction at 200Hz and
boost at 5k)
·
Panned 68% left
|
12
|
Acoustic 2
|
·
EQ (high pass filter, reduction at 200Hz and
boost at 5k)
·
Panned 68% right
|
13
|
Bass
|
·
EQ (high pass filter, reduction at 200Hz and
boost at 5k)
·
Compressor
·
VST Amp Simulator
·
Panned 47% left
|
14
|
Drum Group
|
·
Compressor
·
Reverb
|
15
|
Hihat
|
·
EQ (large high pass filter, boost at 5k)
·
Panned 50% right
|
16
|
Kick
|
·
EQ (boost at 100Hz, reduction at 500Hz, boost
at 2k and low pass filter)
·
Compressor
·
Panned 15% right
|
17
|
Snare
|
·
EQ (reduction at 200 to 500Hz, boost at 5k)
|
18
|
Ride
|
·
EQ (boost at 300Hz and 5k)
·
Panned 50% left
|
19
|
Crash
|
·
EQ (boost at 300Hz and 5k)
·
Panned 50% right
|
Stereo OUT
|
Final Mixdown
|
·
EQ (reduction at 200Hz and 500Hz, boost at 1k
and 5k)
·
Multiband Compressor (reduction at 200Hz and
500Hz, boost at 1k and 5k)
|
Here is the link to both of my mixes:
https://soundcloud.com/user-239608709/sets/mixing-and-mastering
Subscribe to:
Posts (Atom)